Welcome to My Kind of Food. Subscribe to my blog feed or sign up for email updates. (A confirmation email will be sent to your in-box prior to activation. )If you have any issues subscribing, please contact me at hungrygal@rogers.com

Wednesday, July 28, 2010

Bumper Crop


There are some weeks I struggle to find inspiration for my blog. This week was no different. I had no idea what to post this week, that is, until yesterday mid-morning when I was thinking about what to make for lunch.

With the early onset of warm weather this past spring and higher than usual temperatures this summer, the schedule for local produce has been pushed forward somewhat.

While my "crops" have not yet arrived, they are certainly on their way.

The tomatoes (black zebra) are still on the vine ripening...


and my cucumber plant is putting out loads of male blossoms and I waiting for the girls to show up any day now...


My swiss chard and haricot verts (aka French green beans) are a little farther behind as they were planted only recently.


At this point, I don't want to talk about my Nantes carrots or my tomatillos. I have my fingers crossed but hope is quickly fading. It's my first year growing these crops & everyone says they are easy to grow... however, they are either incredibly slow producers or these plants are destined for the compost heap very soon. So the verdict is still out on them!)

In fact, the only things I have been able to harvest so far this year are my herbs (mizuna-pictured below, basil, garden cress and my assortment of micro greens) and of course, my beloved alpine strawberries.


While my crops are still a couple of weeks from harvest, the farmers' markets and the supermarkets are already selling local produce. Zucchini appears to be a bumper crop this year.

There is a neighbor in my 'hood who has a very lovely square foot garden located on the side yard of his house. (I walk past his house daily to check on his garden, but I am not obsessed...) His zukes are spilling out of the box and I am quite certain they are literally growing inches each day. (Zucchini is on my "to plant" list next year!) Since we did not grow it, we bought ours (over 3lbs!) over the weekend and after dinner on Monday night, our supply was out.

Summer fresh zucchini is other worldly; its tender yet crisp when eaten raw and sweet and fragrant when lightly sauteed. This is a rather fast meal to pull together and very light but also quite satisfying.

The microgreens pictured in the photo are actually from my backyard. I have been trying to grow these with mixed success. (I hope to have a post on this item so stay tuned.)


Farfalle with Summer Zucchini and Ricotta
Serves 4

1lb farfalle pasta (bow-tie or some other kind of bite sized pasta, penne, macaroni)

1 tbsp olive oil
1 large onion, large diced (or rough chop)
1 lb zucchini (cut into by sized pieces)

1 large pinch chili powder (optional)
2 tbsp butter
4 tbsp ricotta
1 large lemon - juice & zest

optional: micro green garnish (or other baby green - spinach, arugula, etc.)

1. Cook pasta accordingly to instructions in well-salted water.
2. Meanwhile, in a large saucepan, heat olive oil. Cook onion and zucchini on medium-high heat. Resist the urge to constantly stir the vegetables to allow the zucchini and onions to slightly caramelize.
3. Add chili powder, if using.
4. Drain pasta, reserving at least a cup of pasta water.
5. Add pasta to the large saucepan. Remove saucepan off heat.(If your saucepan is not large enough, transfer to a large bowl instead.)
6. Toss with butter and lemon juice. Mix well. Adding small amounts of the pasta water to loosen pasta as needed.
7. Serve pasta with a dollop of ricotta. Top with microgreens and dust with lemon zest.
...Read more

Thursday, July 22, 2010

Basil Lavender Lemonade


When I was planning the menu at our wedding several years ago, I had considered serving a basil lemonade (spiked with vodka) as part of the cocktail hour, but I had reconsidered because I thought it might be too out there, too unusual for too many of my guests. I would not have had the time to coax friends and families into trying something different so we opted for the standard open bar with an assortment of bottled booze and mixed bevvies.

Since I am still on maternity leave and my son is now enjoying the splendid beauty of regular afternoon naps, I decided to make a pitcher of lemonade to accompany my afternoon of lounging on my back porch reading The Lovely Bones. (On another topic - Have you read it? It may be hot outside, but I feel nothing but chills when Susie talks about Mr. Harvey. It's gripping. Haven't seen the movie, but I think casting Stanley Tucci was a stroke of genius. He is Mr. Harvey.)

An abundance of basil and lavender in my garden this year made sense as a flavour accent to summer's perfect refreshment.

In fact, I may have said this before but lavender is one of my favourite summer time scents... It reminds me of Provence and of a wondrous lavender garden I stumbled upon outside of Kobe, Japan many years ago. Its scent is distinctive and unmistakable. Lavender's mild floral notes acts as a nice counterpoint to the fresh aroma of sun kissed basil and the juicy tartness of the lemon.


Of course, then there is basil. I can't get enough of it. In the summer when our basil is growing faster than we can eat it, we throw it on top of our salads (regular and caprese), sandwiches, pasta, eggs.... It's such a versatile and easy to grow herb. Even if you start it from seed.

To avoid doing time in the kitchen these days, I decided to make a "sun tea." I figure with the heat on the sun pressing itself upon us, I may as well harness its energy for some good...(aside from my ever blossoming container garden - updates to come in the upcoming weeks!)

Sun tea is a gentle way to infuse your summer fresh herbs into a highly delicious, drink-able form. Of course, it means taking the slow road because this brewing method requires alot of time - about six hours worth. But it's rather simple. Throw the lavender in a jar. Add some water. Set the jar out in the sun and set aside while the sun's warm rays gently brew your tea. Strain and add to the lemonade. (The detailed instructions are below)


Oh and if the cucumber garnish seems unusual to you. Please. Trust me. It's excellent.


Basil Lavender Lemonade


2 tbsp dried lavender flowers
half liter water

1 c white sugar
1 c water
1 c lemon juice
handful basil (approximately 1 cup of loose leaves)

1 lemon
1 seedless cucumber (approximately 4 inches worth)

sprigs of basil for garnish
Makes approximately 3 1/2 liters.

1. Fill a half liter jar (or larger) with approximately half liter of water and lavender. Set out in the warm sun for at least 6 hours. (If not making sun tea, use hot water and seep for twenty minutes.) Strain lavender flowers from liquid. Do not press additional liquid from flowers as you may release bitter flavour from the tea.
2. Meanwhile, make a simple syrup by adding equal parts sugar and water. Once the sugar crystals have dissolved, add basil. Stir. Allow syrup to cool to room temperature. Strain out basil leaves and add lavender liquid.
3. Slice lemon cross-wise and cucumbers into medium thick discs. Add lemon juice to a large pitcher, then add cooled simple syrup.
4. Stir well. Pour into glasses, adding a couple of lemon & cucumber slices. Garnish with a sprig of basil. Enjoy. (With or without a splash of vodka.)

...Read more

Sunday, July 4, 2010

Have You Tried Swiss Chard?


Note: I have been experiencing some problems with my email and my spam filter. I always read and respond to your emails so if you have sent me a note and I haven't responded, kindly send it again. Your comments and feedback are always appreciated. Thanks everyone for your support.

Last week, I added rainbow swiss chard to my growing container garden. It won't be ready for at least another 2 months, I think. So in the meantime, I will have to rely on Ontario farmers for my swiss chard fix.

I know that you've seen this beauty in the supermarket. It's one of those greens that sit by the cabbages, collards and kale aka the healthy and under appreciated vegetable aisle at the supermarket. You walk past it week after week without a second glance. But maybe this week it will be different?

Swiss chard is always a deep rich green leaf though its stem may come in an assortment of colours from creamy whites to golden saffron to ruby reds. The flavour is intensely earthy kind of like beet greens or spinach. It's fantastic alongside grilled meat. (I like it with hot Italian turkey sausage.)

When purchasing swiss chard choose a bunch that has ruffled leaves that holdes its shape and slender but firm stems.

Oh, and did I mention it's delicious? Next time, you're at the supermarket or at the farmer's market... check it out by trying this recipe from Marcus Sammuelson's cookbook, The Soul of A New Cuisine. (I am working my way through his cookbook, and it's superb!)

This recipe is a great way to acquaint yourself with this fine, invigorating vegetable.


Creamed Swiss Chard
Adapted from Soul of a New Cuisine by Marcus Sammuelson

2 tbsp vegetable oil
1 medium onion - roughly chopped
1 tbsp minced ginger
2 c shredded cabbage
1 pinch turmeric
1 c cream
1/2 c water
1 bunch swiss chard
1/2 c buttermilk
dusting of nutmeg
2 tsp salt (or to taste)

1. Heat oil in a large deep fry pan
2. Add onion & ginger until onion softens and ginger is fragrant
3. Add cabbage and turmeric. Stir and cook until cabbage softens.
4. Add cream and water and cook on medium heat for about ten minutes.
5. Meanwhile, trim and roughly chop swiss chard into bite sized pieces.
6. Toss swiss chard into pan and cook until chard is reduced. (Like spinach, it cooks down substantially)
7. Turn off heat and stir in buttermilk, dusting of nutmeg and salt. Adjust seasonings as required.
...Read more

Monday, June 28, 2010

Remain Calm & Have a Coconut Bar


Originally this week's post was going to be about turning on your oven in the summer. (ie. Who wants to do that?) But the day I made these gooey bars, Toronto experienced an "earthquake." It originated about a five hours drive from here so what we felt was less intense, but for those who never experienced one before, it sends you off kilter abit.

To comfort myself, I decided to calm my nerves by trying out a dessert I had on my "to do" list.

The inspiration for this recipe came from my Martha Stewart Cookie of the Day email. It was called Gooey Coconut Dream Bars. Wow. How can you resist that? It had me at gooey. I read the recipe and thought it was similar to alot of the bar cookie recipes I like. Pretty quick and easy. It's also a bit of a kitchen sink recipe. Have a small handful of dried cranberries? Throw them in. How about these nuts? Get them in, too!

It occurred to me that the cookie recipe turned out more squares than I wanted. Besides, I didn't have 2 cans of sugary, thick condensed milk, only the one. With some changes here and there, I present to you a bar that is reminiscent of some of my favourite desserts: butter tarts, caramel and macaroons.

Oh yes, all three flavours in one bite. Think creamy, chewy, sticky and certainly, gooey. You don't need an earthquake to make these bars, any old reason will do.

Coconut Bars

Crust:
1 c graham cracker crumbs
1/4c melted butter, unsalted
1/8 tsp salt

Filling:
1 c sweetened coconut flakes
1/2c semi-sweet chocolate chips
1/2c Thompson raisins
300ml sweetened condensed milk (1 can)

1. Preheat oven to 350 degrees. Prepare a 8 x 8 square pan by lining it with parchment paper. Leave at least a 2 inch overhang on two adjacent sides to ease of removal.
2. Mix crumbs, butter & salt together. Press evenly into the square pan, bringing at least 1/2" up the sides.
3. Bake for 12 minutes. Allow to cool slightly.
4. Meanwhile, mix together condensed milk, coconut shreds, raisins and chocolate chips.
5. Pour mixture into the prepared pan. Smooth out filling ensure that corners are filled.
6. Bake for 20-26 minutes. When the filling starts to caramelize and bubble along the edges, remove from oven. Cool.
7. With a sharp knife, cut squares. (Clean off the knife after each cut for a neat look.)

...Read more

Tuesday, June 22, 2010

Smoked Salmon With Fennel Salad


Some time during the month of June, I lost track of time. As I sat down to write this recipe, I had thought June had just begun but now it looks like we're on the last lap of the month. How did that happen? Well, at least, we finally have our weather. This morning, I went to look at my tomatoes & tomatillos and it's like they have grown overnight. Nice thick stems, beautiful verdant leaves and elegant little flower buds. (I especially love the smell spritzed into the air as I squeeze the suckers off my tomato plants. It is intoxicating like catnip for gardeners.) While the forecast for this summer is hot, I still cross my fingers for good weather and hopefully it will yield a bounty of highly rewarding, home-grown heirloom vegetables for summer eating.

Which brings me to this week's recipe... Outside of maybe barbeque, there is nothing that symbolizes summer eating more than a refreshing cool, crunchy salad. In our household, this week's salad is our current favourite. (Who can say no to smoked salmon?) It pairs feathery-thin fresh fennel with rich, smooth unctuous smoked salmon. It's a beautiful salad that can be piled high in a large bowl and gobbled up or it may be served elegantly on a long platter for dinner guests. Either way, it is delicious and does not require much effort.*

*Perhaps after you read this recipe, you will disagree, but I will disclose upfront that this recipe calls for shaved fennel. Therefore, it requires the use of some sort of kitchen gadget, I know. Although, shaving fennel may seem daunting and hardly worth it, believe me, it is worth it (and probably not as bad as you think once you get into it.) The papery slices of fennel stay crisp and crunchy but allows the vinaigrette to permeate creating a kind of "quick" pickle. It's an anise and citrus flavour explosion. Perfect for a hot day. Perfect paired with smoked salmon. Trust me. Worth the effort.


Shaved Fennel Salad With Smoked Salmon
Serves 4 as a starter (or 2 as a light lunch)

1/2 large fennel bulb (reserve some fennel fronds)
150 grams smoked salmon, sliced

1 tbsp grainy Dijon mustard
4 tbsp extra virgin olive oil
1 tbsp lemon juice
salt & pepper

1. In a large bowl, shave fennel into wispy thin slices. I use a benriner (or mandolin) but if you don't have one, slice fennel into thin pieces with a sharp knife.
2. On a large plate, lay out smoked salmon in a single layer.
3. In a medium sized jar, add Dijon, olive oil & lemon juice. Place lid on tightly and shake. Pour over fennel and toss. Add salt & pepper. Taste. Adjust seasonings as necessary then allow to fennel to marinate for at least ten minutes.
4. To serve, pile fennel high over smoked salmon. Sprinkle some of the reserved fennel fronds on top.

...Read more

Monday, June 7, 2010

Oh Happy Day!


I spent most of the weekend, in the backyard tending to my humble vegetable garden... finally. The heirloom tomatoes & tomatillos are now in and my peas, radishes, and beets now have their early leaves. Yes, I know it's already June and it is a little bit late, but I have a decent excuse. Our backyard renovations have just been completed. It was a total gut job. Unfortunately, it was not a renovation we had planned, but nevertheless had to be taken care of. In the end, we have a space at the back of our house we can claim as our home.

If that was not already enough to contribute to my joyful mood, my husband and I drove across the city to pick up this


It's an alpine strawberry. Perfect for container gardening and apparently superior in taste to the mass-cultivated sort. (I know it may be a little late - it's practically strawberry season around here. But I am an optimist.) While I love all my plants, my strawberry plant is my most precious. She is my pride and joy.

Oh happy day, indeed.

Onto this week's recipe...

For dinner this evening, my husband put steaks on the grill. I went into the fridge to rummage around for something else to go with dinner. Then an unusual guest made it to dinner last night. The previous day, I had summoned the courage to try Belgian Endive again after watching a review of a local restaurant on tv. I don't normally like bitter vegetables but, I thought I would give it a go.

Roasting vegetables seems to be such a natural way to eat them when it's warm out and the bbq is already on. The hot hot heat softens crisp vegetables, intensifies their inherent sweetness and exudes a wonderfully smokey aroma. There is nothing like the summer's bounty roasted on a hot barbie and why should endive be any different? The result is bittersweet, slightly crunchy and perfectly complemented for an unctuous bbq'd steak.


Grilled Belgian Endive


Serves 4

2 Belgian Endives
olive oil
salt & pepper

1. Heat BBQ on high heat (this can be prepared with a hot grill pan on a stove)
2. Clean & quarter Belgian Endives
3. Toss with olive oil & salt & pepper
4. Place on hot grill until grill marks appear & slightly caramelized. Flip and repeat on all three sides.
5. Serve immediately. ...Read more

Sunday, May 30, 2010

Warm Bok Choy & Mushroom Salad with Crispy Garlic

I'm back!

It was a splendid retreat to Barbados. The three of us splashed in the ocean, walked along the beach and filled our bellies with flying fish.


While on holiday, our hotel room had a small stack of high quality glossy magazines which really were adverts for duty free shopping, sport facilities (golf, polo!), and restaurants on the island. I never opened the duty free shopping or the sports magazine... There was only one magazine that was of particular interest to me. Not only did they have shiny photos of seared scallops, grilled tenderloin and glistening sashimi, they published feature menus from these establishments. I was obsessed with this little magazine. Night after night, I flipped through its pages dreaming of the culinary extravaganzas being prepared for the guests of this island.

This week's recipe was inspired by a menu item I found in the magazine.

It uses my favourite Asian green, Shanghai bok choy. It's very mild in flavour and holds shape fairly well. If you don't like bok choy or it's not available, you can also use other types of greens....baby spinach springs to my mind.

What I enjoy the most about this dish is the variety of textures... crunchy bok choy, meltingly tender mushrooms, crispy crunchy garlic bits.

This would be a wonderful accompaniment to grilled steak or seafood.


Warm Baby Bok Choy & Mushroom Salad With Crispy Garlic


2 garlic cloves roughly chopped
2 tbsp vegetable oil
1 lb baby Shanghai bok choy, washed & separated
1 lb assorted mushrooms (eg. oyster, shitake, etc.)
1 tsp mustard powder
1 tsp minced ginger
1 tsp low sodium soy sauce
1 tbsp oyster sauce

approximately 1 tsp lemon juice (about 1 wedge of a fresh lemon)
s&p to taste
sesame seeds

1. Heat a large frypan on high-medium, add 1 tbsp vegetable oil. Swirl around pan. When it shimmers, add garlic & turn down heat. Cook garlic until golden and caramel in colour. Do not allow it to burn. Set aside.
2. Roughly chop baby bok choy into bite-sized pieces.
3. Heat remaining vegetable oil on high heat. Add mushrooms, saute on medium heat until mushrooms lose their firmness. Add bok choy until wilted. Stir in mustard powder, ginger, soy sauce and oyster sauce. (Taking care not to leave the vegetables in the pan in too long.)
4. Add lemon juice. Taste, then adjust salt & pepper to your liking.
5. Return the crispy garlic to the dish. Add sesame seeds. Toss before serving warm.
...Read more

Monday, May 10, 2010

Press Pause

I had planned to post before my vacation this week. But as it turned out, the days leading up to a holiday are chaotic and a tiny bit stressful. So I will see you in a couple of weeks with lots to say.

Looking forward to rum punch and happy hour....

See you in a few.

Tuesday, May 4, 2010

Fried Rice Club


I never met a fried rice I didn't like. While there are some I definitely like more than others, it is one of those foods I love to eat, especially on a lazy Saturday afternoon.

Fried rice originated as a way to use up leftovers. A simple and frugal idea: toss last night's rice with small bits of vegetable and meat, throw in a couple of lashings of salty umami-laden soy sauce and lunch is served.

Who would have guessed something so simple and humble could have turned out so horribly wrong. I like to think of myself who has some skill in the kitchen but the first time I made fried rice it was an utter disaster. Instead of the comforting, glorious fried rice dotted with bits of egg, peas and onions I had envisioned, the reality was something else altogether. My fried rice was a heap of steaming, gluey rice. Not even a distant cousin of the real thing, it was a science experiment gone terribly wrong.

Since then, I have learned there are rules to Fried Rice Club. If you follow the rules, you too, can have moist, fluffy, flavourful fried rice.

1. You must use cold rice.
2. You must use cold rice.
3. When your wok is hot and the oil is shimmering, and only when your wok (or fry pan) is hot, do you add rice.
4. Leftover ingredients are a must.
5. Meat and vegetables should be bite-sized pieces.
6. Most ingredients must be cooked before adding them to rice.
7. Keep everything moving.
8. If this is your first time at Fried Rice Club, you must use cold rice.

As I have mentioned many times before, my kitchen goddess, Kylie Kwong, often makes use of malt vinegar in mnay of her recipes, including her fried rice. (I have a cookbook of hers that devotes practically an entire chaper to fried rice!) While I am not sure if this is an authentic flavour, I use it quite abit in my fried rices and stir frys. Malt vinegar imparts a great deal of rich flavour and colour( like soy sauce) without the sodium and doesn't have a sharp acidic vinegary taste.

If you don't like bacon (what?), you can substitute other types of meats such as thinly sliced chicken, pork, beef. Flash fry them first before adding them in. (Or you could use cubed pieces of Chinese sausage, kolbasa, etc. Still need to fry them before adding to the rice to render some of the fat & to crisp up the meat.)

Bacon Fried Rice

4 strips extra thick bacon
2 tbsp + 2 tbsp vegetable oil
2 eggs
4 c cold white rice
2 tbsp reduced sodium soy sauce
1 tbsp malt vinegar
1/4 tsp chili flakes
1 c pineapple tidbits, drained well

salt & pepper to taste
3 green onions, thinly sliced or a small bunch of chives, snipped into 1 inch pieces
optional: 1 tsp toasted sesame oil


1. Slice bacon into small strips and fry until crisp. Drain on paper towels and set aside.
2. Heat a large fry pan or wok. Add vegetable oil and swirl oil around until it shimmers. Crack the eggs over the oil and stir quickly. Breaking up the egg with a wooden spoon or spatula. Remove from pan when soft curds form and set aside.
2. Add vegetable oil and heat again until the oil is hot and shimmers. Add cold rice, breaking up pieces with a wooden spoon or wok spatula (if you have one). Cook for at least 2 minutes, moving the rice around the pan.
3. Add soy sauce, malt vinegar & chili flakes. Stir to coat rice.
4. Add in the drained pineapple and stir well to incorporate.
5. Return bacon and egg to rice mixture and stir again.
6. Taste for seasoning. Add salt, pepper and green onions and sesame oil, if using. If you like your fried rice a bit darker, experiment with a touch more soy sauce or malt vinegar. (Start with small increments such as a teaspoon and taste before adding again.)
7. Serve immediately.

If you are adding adding vegetables or uncooked meat, you will need to cook them slightly first. You can cook them in your fry pan first and set them aside until ready to use.
...Read more

Tuesday, April 20, 2010

Marinated Olives


Every so often, I need some Me Time. It's just a couple of hours to do as I like (go for a massage, watch Sex in the City re-runs, or read a book.) Since the arrival of my little guy last November, I have had little to no Me Time. Don't get me wrong, motherhood is a joy and our little guy is just great. But sometimes, a girl needs to relax.

This weekend, I got my wish. A spa day with my girlfriends while my husband took over as the primary caregiver. An afternoon of pampering and relaxation is what I needed. After hours of kneading, buffing, and steaming, I felt reborn.

The only way to end the day was with a vodka martini with fat green olives.

Even if you don't like martinis, these marinated olives are out of this world. Large and meaty, these olives pack quite a punch spiked with heaps of chili flakes and lots of lemon. Serve them as part as a tapas or antipasto platter, or toss in a Greek salad.

However, these olives do require a little pre-planning... to fully enjoy these beauties, they need to rest in the back of your fridge for at least a week for the flavour to develop.

Oh, and the best moment of my Me Time was when I returned home. My son was clean and fed and the two men in my life were all smiles.


Marinated Olives

1 lb large green olives in brine (pitted or unpitted)
1 lemon
2 tbsp chili flakes (or to taste)

1. Strain olives from brine and place in a large bowl.
2. Using a vegetable peeler, peel long swaths of lemon zest. Place on top of olives. Slice lemon in half, cross-wise, and juice. Add juice to olives. Toss well.
3. In a clean jar, fill with olive mixture.
4. Top up with remaining brine until full.
5. Place in fridge and allow olives to marinate for at least 1 week for optimal flavour.

...Read more

Monday, April 12, 2010

The Perfect Side: Roasted Cauliflower


Until several months ago, cauliflower was one of those vegetables that just was. I didn't love it but I didn't hate it either. It always seemed to make appearances at the snack table at some boring conference as part of the crudite platter. Meh. Although occasionally, it would make a delicious appearance in Aloo Gobi, an aromatic Indian dish of cauliflower and potato or simply steamed with a boatful of cheddary cheese sauce on the side. But outside of that limited repertoire, I wasn't really that friendly with the crucifer.

But then several months ago, I stumbled upon a Martha Stewart Food magazine recipe for roasted cauliflower. Finding this recipe was like a relevation. The skies opened and angels sang. Who would have thought to roast cauliflower? Brilliant.

I like roasting vegetables primarily because it is very easy to do and also it brings out flavours other cooking methods can't. In this case, roasting cauliflower results in a beautifully caramelized and sweet side dish. The inclusion of smoked paprika adds some depth to the crucifer's mild flavour.

The best part of this recipe is it takes no time to make it. Just need to break the cauliflower down into florets and it's good to go.

Additionally, I think this would make a superb cream of cauliflower soup. I will have to try it one day and post back if it works out...


Roasted Cauliflower
Adapted from Martha Stewart Food


1 head cauliflower
1 tbsp olive oil
smoked paprika
salt & pepper

1. Preheat oven to 400 degrees.
2. Meanwhile wash & dissemble cauliflower into florets.
3. Toss with olive oil. Season with salt & pepper & a pinch (say 1/4 tsp) of smoked paprika. Spread florets out onto two large baking sheets.
4. Roast in oven for at least 25 mins or until slightly bronzed and caramelized.
...Read more

Monday, March 29, 2010

Diggin' Through The Pantry


It was a daunting task... one I had been dreading for some time. But this weekend, I decided to fling the door open on my pantry to "re-discover" some of the treasures that lurked deep inside.

Among the unforgotten items, I found 3 bags of panko, 6 cans of tomato paste (um, have you seen the tv show, Hoarders?), 1/3 bag of split lentils, a jar of black rice, a package of falafel mix, and 1 carton of black strap molasses. Thankfully, none of my finds were in there too long, except for, maybe the molasses. But the lentils gave me an idea...

After spending time in Nepal eating nothing but lentil curry everyday at every meal, I lost my interest in the little legume. Now, I love them. In fact, I can't get enough of them. Especially as a part of a soup. With Spring upon us, I wasn't really in the mood for a heavy and hearty wintertime soup. I wanted a light lunch but, also something satisfying. One spoonful was all it took to make me smile. It's a kaleidoscope of bright colours with a very mild and fresh flavour. Just in time for Spring.

This week's recipe is very easy and fast to make. Lentils don't require pre-soaking so they cook rather quickly. But if you prefer, canned lentils substitute very nicely and speed up cooking time.

Just before serving, I add a healthy dollop of 2% yogurt and swirl it through the soup just before eating. It brightens up the soup, adding a tang & creaminess without the calories (if you aren't watching your weight, you could always use creme fraiche.)


Lentil Soup for Spring

1 finely chopped onion
1 tbsp olive oil
1 l low sodium vegetable broth (or chicken broth)
1 1/4c split lentils
1 large carrot roughly grated
salt & pepper

2% plain yogurt
approximately 1 tablespoon of herbs: eg. chives, dill, parsley

1. Lightly cook onion in a medium sized pot until onions are translucent. Add broth and turn up heat. Meanwhile, rinse lentils well. Add wash lentils and grated carrot to pot.
2. Simmer for at least 30 minutes. Check for seasoning and doneness.
3. Serve with a generous dollop of plain yogurt and a sprinkling of chopped fresh herbs.
...Read more

Monday, March 15, 2010

Drowned: Ice Cream Floats Italian-Style


There is a certain chain of coffee shops where people stand in long lines for a medium double-double. In this country, people are utterly devoted to this brand and you can practically find a location on every corner. While I understand the appeal, personally, I prefer a stronger brew.

Years ago, I bought myself a little espresso machine so I could get the good stuff at home. Oh, the joy it brought me! Lattes in the morning with the paper before work, and espressos in the evening after dinner. It was civilized. But over the years, our espresso machine gave way to our programmable coffee maker. It was a simple pleasure, to hear it buzz the beans in the morning and by the time we walked into the kitchen, coffee was brewing. It was nice but not the same.

We recently discovered some of the best coffee in Toronto but it didn't come from a coffee shop. Just a guy with a roaster (so his website says) who roasts some pretty delicious stuff. We bought 2 pounds of coffee: 1 pound of a fair trade espresso roast and another pound of a fair trade dark roast. Like children, we love both our coffee machines and we spoil them rotten!

Aside from drinking it, I made a simple but luxurious dessert with our espresso: Affogato. Literally, hot espresso poured over cold vanilla ice cream. Think of it as Italy's answer to the ice C\cream float.

Affogato means drowned in Italian. It's vanilla ice cream doused in a bath of hot, freshly brewed espresso. Pure heaven. (Even if you find espresso "too strong.") The creaminess of the vanilla ice cream tempers the assertiveness of espresso and the result is a rich, velvety, creamy and bold dessert. So simple, and so divine. The only challenge with this dessert is to try to savour it before all the ice cream melts away.

When you make such a simple dessert, splurge on good quality ice cream and espresso. If you don't have espresso, brew some good quality strong coffee.


Affogato
per person

Allow your guests to pour espresso on top of their desserts.

1 scoop vanilla ice cream
1 shot freshly brewed espresso (or strongly brewed coffee)

1. Scoop ice cream into dessert glass. Return the freezer while you make espresso.
2. Brew espresso.
3. Remove ice cream from the freezer and serve espresso alongside.
4. Pour espresso over ice cream and devour!

I have found the perfect proportion is one scoop of ice cream to 3/4 espresso shot.
...Read more

Tuesday, March 9, 2010

Duck, Duck, Goose...


One of my "to do"s this week was to cook that duck I received as a part of my Wholearth CSA (Community Sponsored Agriculture) "meat share."

Wholearth and other CSAs sell "shares" which entitle the buyer to an allotment of the farm's annual harvest. It is small-scale, community-oriented, local farming versus the ubiquitous agribusinesses which produce most of the fruits, vegetables, meat and dairy most of us consume. While I don't want to wade into food politics here, I would be remiss if I did not mention this as a hot button issue for many. My CSA experience has brought me closer to the food I eat. I have a greater awareness of where it comes from and the people who grow/raise it. Politics aside, I have noticed a discernable difference in the flavour of our meats - they tend to be absolutely tender and juicy. (My husband who is our family skeptic would even attest to this... :) )

Anyway, back to that duck in the freezer. We never grew up on duck at home. My dad does not like it and therefore, my mom never cooked it. But eating duck in a Chinese restaurant is certainly a spectacle to be experienced. Imagine a deeply lacquered bird presented to your table. A skilled server carefully lifting away the shatteringly crisp skin and cuts it into portions for the table, then he dissects the moist and flavourful meat into bite-sized pieces. However, making this dish (popularly known as Peking Duck) as Heston Blumenthal can attest to, is one cumbersome task. (Heston Blumenthal documented the arduous journey for the best Peking Duck in his television show, In Search of Perfection.)

I like duck but not enough to go through that hassle.

However, some research on the internet bolstered my confidence that duck could be prepared easily and quite deliciously. As easy as roast chicken. With my new found knowledge in hand, I set out to make a darn good roasted duck.

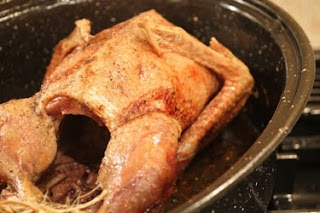
We ate this gorgeous beast in a cheater's version of Peking duck. I removed the meat from the carcass and served it with traditional accompaniments: Hoisin dipping sauce (recipe below) and lots of fresh, juicy cucumber. We skipped out on the pancakes (too tired to make and too lazy to buy) and green onions. Perhaps next time...

This recipe produces a duck that is moist, richly flavourful but not greasy. We gobbled up the skin like children eating candy and the rest of the duck disappeared shortly thereafter. We saved the bones for stock and some of the fat for frying eggs for breakfast the next day. (In addition, I have used duck fat to roast potatoes and they are marvelous.)

Roasted Duck with Hoisin Dipping Sauce


3-4 lb duck
1 tbsp minced ginger
salt & pepper

1. Preheat oven to 375 degrees. Wash duck thorough and pat dry.
2. Sprinkle salt & pepper over duck's skin and inside the cavity.
3. Rub ginger inside the cavity. Truss duck and place in large roasting pan.
4. Roast duck for at least two hours. Basting occasionally.
5. Turn oven temperature to 350 degrees and continue to roast for another 30 minutes.
6. The duck is ready when the skin is browned and crisp and the legs appear very loose. (Legs should come off very easily by the time you serve.)
7. Allow duck to cool for at least 15 minutes (or cool enough to handle)

At this point, you can serve the duck by cutting it into quarters and serving or pull off the bones and serve with this silky Hoisin dipping sauce and lots of cucumber spears.

Hoisin Dipping Sauce
2 tbsp Hoisin
1 tbsp lemon juice
zest from 1 lemon
1 pinch of chili flakes
1 tsp honey

1. Mix together and serve with roasted duck. (Also is great as a marinade for chicken or fish.)

...Read more

Monday, February 22, 2010

Oh Canada!


If you've been living on a desert island, you may not be aware that the Winter Olympics are currently taking place in beautiful Vancouver, British Columbia. It's somewhat of a big deal here in Canada and admittedly, I do beam with pride when I see those gorgeous aerial shots of Vancouver and surrounds. It's a beautiful part of our country and I am glad that the rest of the world now knows about this magical and beautiful place.

Not only is Vancouver known for its spectacular natural beauty, it is also a mecca for cuisine. Some of Canada's best known restaurants and chefs are found in this city and food trends that eventually find themselves in Toronto often have their roots in Vancouver. With its close proximity to the sea, it is no wonder that Vancouver also boasts some of the best sushi outside of Japan. And if you are in search of seriously fresh fish and that connection to the people who "catch" your food, drive out to Richmond, a suburb of Vancouver, to meet the fishing boats and inspect that morning's catch. You probably couldn't find fresher fish.

For this week's post, I thought I might do something Canadian inspired to celebrate the Olympics. While there isn't really a Canadian cuisine in the same way there is distinct French, Japanese or Italian food, I think the consensus is that Canadian cuisine is probably characterized by the use of our local produce and local flavours.

I came up with a dish that reflects the foods of this vast nation. From the West, there is nothing more reflective of BC than salmon, from the Prairies, I chose lentils (Did you know that Canada is the world's largest exporter of lentils?), and from the East, glorious maple syrup from Quebec.

The salmon is prepared very simply - it is pan seared until the skin crisps up and finished with a glaze of maple syrup from Oka, Quebec. Then it is laid a top of bed of lovely brown lentils. (For this dish, I prefer French lentils (when I can find them) as they keep their shape and don't shed their skins when cooked. Unfortunately, for this post, I could not find them and have substituted brown lentils. The texture is slightly different but still delicious nevertheless.)


Grilled Salmon with Warm Lentil Salad

1 lb Pacific center-cut salmon - cut into four portions (or if you are looking for larger portions, I would say 1/2lb per person)
1 c brown lentils (or Du Puy aka French lentils, if available)

1 lemon - zest & juice
1 1/2 tbsp capers
1 tsp sugar
2 tbsp light olive oil
1 tbsp vegetable oil
optional: maple syrup for finishing

1. Cook lentils according to package instructions. Do not overcook.
2. Meanwhile, roughly chop capers. Add to a large bowl along with lemon zest, juice, sugar & olive oil. Once lentils are cooked drain them well and add them to vinaigrette. Gently toss.
3. Heat 1 tbsp of vegetable oil in a large pan on high heat. Turn down to medium-high and cook salmon skin side down until the skin is nicely browned and crisp. Carefully turn fish over and cook on the opposite side. Cook until medium - approximately 10 minutes.
4. Serve salmon immediately on a bed of warm lentils.

*If there is leftover lentil salad, it is delicious on its own with some crumbled goat cheese on top.

Go Canada Go!
...Read more

Monday, February 15, 2010

A Light Lunch

It's been three months since I had my baby. He's healthy, beautiful and wonderfully cheery.


And while it took nine months to put on the weight during my pregnancy, I am quite eager to get to my pre-pregnancy shape.

It's time to take action.

But I love to eat and this is a food blog... so let's not go crazy here.

Maybe we should have lunch first....

Normally, I make a mini version of these crab cakes as an hor d'oeuvre for parties. And gosh, they are delicious. These are so simple to make, perfectly paired with a light salad for lunch.

I use lump crab meat as I love biting into the little nuggets of crab delicately held together by a savoury, moist filling brightened with a hint of citrus and dill.


Crab Cakes
(makes approximately 4 crab cakes)

1/4 lb crab meat, well drained (lump crab if you have it)
1 tsp finely minced dill
1 tsp finely minced parsley
1/2 tsp celery salt
pinch of smoked paprika (or regular paprika)
pinch of freshly ground pepper
1/2 c panko crumbs
1 egg lightly beaten
1 tsp lemon juice
(* 1 tsp Old Bay Seasoning - I normally add Old Bay to my crab cakes but it isn't available everywhere. If you have it, I'd reduce the celery salt to 1/4 tsp but add a pinch of salt to the mixture.)

1/2 c panko crumbs in a separate shallow bowl

1 tbsp butter

1. Gently fold dill, parsley, celery salt, paprika, pepper, panko crumbs, egg and lemon juice into drained crab. Don't overmix and try to keep crab in chunks.
2. Divide the mixture into quarters and gently shape into patties.
3. Gently coat crab cakes in panko bread crumbs. Set aside on a plate. Repeat. Cover crab cakes with cling wrap and refrigerate for 30 minutes.
4. Melt butter over medium heat in a large fry pan until butter is foamy.
5. Gently fry crab cakes until golden brown and toasty. (Flip crab cakes over only once.)
6. Serve immediately with a side salad.
...Read more

Tuesday, February 9, 2010

Wonton Soup


Recently I started to think about the foods my family ate when I was a child and even though my little guy is still way too young for solids, it got me to thinking about the foods I could/would make for my family. My mom made wonton soup practically every night when we were kids. Like most moms, she had a day job and then came home to her second job as a full-time mom. I remembered how she quickly folded a couple of wontons and dropped them into a boiling soup pot just in time for dinner. Wonton soup was such a delicious way to start dinner.

If you have never had the pleasure, please do go out and try this. Wontons are little bite-sized dumplings usually filled with a mixture of meat and seafood. (In this case, chicken and shrimp.) The wonton wrapper is made of a thin dough similar to pasta but tastes much lighter. Wontons are often dropped directly into soup or pre-poached into boiling water before being added to a soup. A few minutes in a hot bath and they are transformed from smooth semi-opaque triangles into ruffled, translucent silky bundles.

Although it is an extra step, I prefer to cook them in boiling water first. Some wrappers are a bit starchy and may change the flavour and the consistency of the soup.

Admittedly, making a batch of wontons is a bit of work if you decide to make a full batch... However, if you are making just enough to a pot of soup, then once you make the filling it shouldn't take much longer to wrap a couple of wontons and throw them into a soup.(The filling should keep for about 3-5 days in the refrigerator.)

Alternatively, you can make the entire batch of wontons and freeze them. Once they are made, you can just plop them into a boiling broth and have wonton soup in minutes without having to defrost them first.


Wonton Soup

For the filling:
1/2 lb ground chicken
1/2 lb shrimp, chopped
2 green onions, finely chopped
1 tsp sesame oil
1 tsp minced ginger
1/4 c water
salt & pepper to taste

1 package of wonton wrappers

For the soup:
750ml low sodium chicken broth
2 green onions, finely chopped
1 tbsp sesame oil

optional: lightly beaten egg

1. Gently mix together the filling except the water. Meanwhile bring to a boil a small pot of water. using a teaspoon, drop a small meatball into the water once the water reaches a rolling boil. When the meatball floats to the top, leave in the water for an additional minute and scoop out onto a plate. Allow to cool. Taste meatball for seasoning and adjust accordingly. (Once you have made this recipe several times, you will find this added step is unnecessary.)

2. Once satisfied with seasonings for the filling, place a teaspoon of the mixture into the center of the wonton wrapper. Dip your finger into a small bowl of water and wet two adjoining sides (in an L-shape). Fold the opposite corner over until the edges meet and gently press the wonton closed, removing any air pockets. You will be left with a triangle shaped wonton. Place the wonton on a large platter and repeat until all the wonton wrappers or meat mixture is finished. Do not overlap the wontons on the platter. If you have additional meat left over, a great way to use them is to make tiny meatballs to add to your soup.

3. If you are not using the wontons immediately, lay the wontons out on a cookie sheet in a single layer and freeze for ten minutes. Then store the wontons in a freezer bag for later use.

For the soup:

1. Bring to a boil the chicken broth and green onions.

2. In another pot, bring water to a boil. One by one drop wontons into the water and stir to ensure the wontons do not stick together. Once the wontons, rise to the surface, scoop out the wontons and move to the pot with the boiling chicken broth. Reduce temperature and simmer for another 2 minutes.

3. If using, stir broth in the pot so that the liquid is squirling about. Gently pour the lightly beaten egg into the broth. After about five seconds, swirl a wooden spoon around the pot until the egg is cooked into whispy strands.

4. Remove from heat and add sesame oil. Serve immediately.

If you are serving this as an appetizer, it easily serves four people with about 5 wontons each. If you are having this as a main, it feeds 2-3 people with 8 to 10 wontons each.

For your own variations, you can experiment with different types of meat - pork or beef, or consider the additional of other seasonings including chili, white pepper, or five spice.
...Read more

Monday, February 1, 2010

What to do with Barley


I have developed tendonitis (from carrying the baby!) and therefore, typing is a bit of a challenge... so please forgive the short post....

It's officially February and I am still clinging to the hope of losing some weight this winter. I am trying to watch what I eat (with the acknowledgement that I will be falling off the wagon this Superbowl weekend) and I have also started to exercise again. But it's the middle of winter afterall and the days are so dreary. It seems far easier to cuddle up on the sofa with a good book, and consume copious amounts of junk food than to go for a run. But that's just me...

In my search for something healthy and easy, I saw a bean salad at the deli section of the supermarket and thought perhaps this would hit the spot.

Enter barley. It's a grain and a great source of fibre. Therefore, you can feel full without gorging on naughty things like french fries, hamburgers and chocolate or feel like a rabbit by eating a rather large bowl of lettuce.

Wonder what to do with barley?

A couple of things I like to do are:

1. Add cooked barley to beef stew or to soups
2. Substitute arborio rice as a "risotto"
3. Barley water (Seems weird but bear with me - it's a British drink where you mix boiled barley water with sugar and lemon juice. It's actually very delicious.)
4. Add into a salad - delicious with chicken and dried cranberries or this barley and beans salad.


Barley & Bean Salad

1 c pearled barley
1 can navy beans

2 tbsp olive oil
1/4c lemon juice
1 c petit pois (sweet green peas)
1 small carrot, peeled and diced into small cubes
1 tsp honey
1 tsp dill
1 tsp parsley

salt & pepper
optional: crumbled goat cheese

1. Rinse barley in cold water until clear. Cook barley according to package directions (approximately 20-25 minutes in 4 c of water.)
2. Rinse beans in cold water and set aside. Meanwhile mix olive oil, lemon juice, honey, dill and parsley together.
3. Once barley is tender, drain and add to bean mixture.
4. Serve warm topped with crumbled goat cheese.
...Read more

Monday, January 25, 2010

Superbowl Meatballs


Happy New Year!

Hope your holidays were filled with lots of friends, family and delicious food.

As the Superbowl is just around the corner, this is the time to start considering foods for the big day. I like meatballs for casual get togethers. They are the ultimate party food!

The inspiration for this recipe came from my mother-in-law who gave me her recipe. I adjusted this recipe to make it extra saucy and to brighten the flavour with the addition of citrus. While it may seem a little different from other sweet and sour meatball recipes with the cranberry sauce & orange zest, but trust me, it tastes wonderful!

The best part about these meatballs is they can be made ahead and frozen. They cook from frozen very easily and the sauce is a snap to pull together.

Sweet and Sour Meatballs

1 lb lean ground beef
¾ cup of bread crumbs
1 egg
2 tbsp finely diced onion
2 tbsp milk
2 cloves garlic minced
1 tsp salt
pinch of black pepper
vegetable oil for brushing

1 c Heinz Chili sauce
1/4 c orange juice
1 tbsp lime juice
1 c cranberry jelly
zest of 1 orange

Mix together the beef, breadcrumbs, egg, onion, milk, garlic, salt & pepper. Form into approximately 40 bite-sized meatballs and place on a cookie sheet. Freeze cookie sheet for at least twenty minutes. (If you are making the meatballs ahead, you can remove the meatballs from the cookie sheet and place in a resealable freezer bag and store in the freezer until you are ready to use.)

Preheat oven to 400 degrees. Brush meatballs with vegetable oil and bake in the oven for approximately 15 minutes until fully cooked. In a large saucepan, or slow cooker, combine chili sauce, orange juice, lime juice, jelly and zest. Add meatballs. Stir well. Simmer 10-12 minutes on stove top or cook on low in the slow cooker. The sauce will thicken. Baste occasionally.

...Read more
LinkWithin Related Stories Widget for Blogs