Welcome to My Kind of Food. Subscribe to my blog feed or sign up for email updates. (A confirmation email will be sent to your in-box prior to activation. )If you have any issues subscribing, please contact me at hungrygal@rogers.com

Thursday, July 22, 2010

Basil Lavender Lemonade


When I was planning the menu at our wedding several years ago, I had considered serving a basil lemonade (spiked with vodka) as part of the cocktail hour, but I had reconsidered because I thought it might be too out there, too unusual for too many of my guests. I would not have had the time to coax friends and families into trying something different so we opted for the standard open bar with an assortment of bottled booze and mixed bevvies.

Since I am still on maternity leave and my son is now enjoying the splendid beauty of regular afternoon naps, I decided to make a pitcher of lemonade to accompany my afternoon of lounging on my back porch reading The Lovely Bones. (On another topic - Have you read it? It may be hot outside, but I feel nothing but chills when Susie talks about Mr. Harvey. It's gripping. Haven't seen the movie, but I think casting Stanley Tucci was a stroke of genius. He is Mr. Harvey.)

An abundance of basil and lavender in my garden this year made sense as a flavour accent to summer's perfect refreshment.

In fact, I may have said this before but lavender is one of my favourite summer time scents... It reminds me of Provence and of a wondrous lavender garden I stumbled upon outside of Kobe, Japan many years ago. Its scent is distinctive and unmistakable. Lavender's mild floral notes acts as a nice counterpoint to the fresh aroma of sun kissed basil and the juicy tartness of the lemon.


Of course, then there is basil. I can't get enough of it. In the summer when our basil is growing faster than we can eat it, we throw it on top of our salads (regular and caprese), sandwiches, pasta, eggs.... It's such a versatile and easy to grow herb. Even if you start it from seed.

To avoid doing time in the kitchen these days, I decided to make a "sun tea." I figure with the heat on the sun pressing itself upon us, I may as well harness its energy for some good...(aside from my ever blossoming container garden - updates to come in the upcoming weeks!)

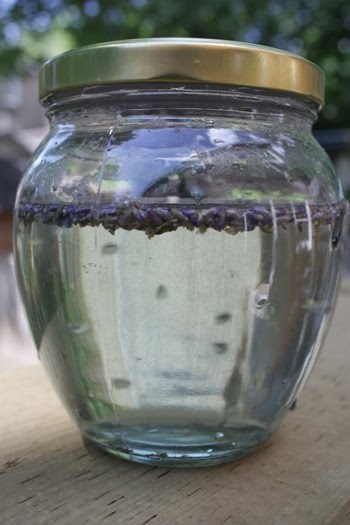
Sun tea is a gentle way to infuse your summer fresh herbs into a highly delicious, drink-able form. Of course, it means taking the slow road because this brewing method requires alot of time - about six hours worth. But it's rather simple. Throw the lavender in a jar. Add some water. Set the jar out in the sun and set aside while the sun's warm rays gently brew your tea. Strain and add to the lemonade. (The detailed instructions are below)


Oh and if the cucumber garnish seems unusual to you. Please. Trust me. It's excellent.


Basil Lavender Lemonade


2 tbsp dried lavender flowers
half liter water

1 c white sugar
1 c water
1 c lemon juice
handful basil (approximately 1 cup of loose leaves)

1 lemon
1 seedless cucumber (approximately 4 inches worth)

sprigs of basil for garnish
Makes approximately 3 1/2 liters.

1. Fill a half liter jar (or larger) with approximately half liter of water and lavender. Set out in the warm sun for at least 6 hours. (If not making sun tea, use hot water and seep for twenty minutes.) Strain lavender flowers from liquid. Do not press additional liquid from flowers as you may release bitter flavour from the tea.
2. Meanwhile, make a simple syrup by adding equal parts sugar and water. Once the sugar crystals have dissolved, add basil. Stir. Allow syrup to cool to room temperature. Strain out basil leaves and add lavender liquid.
3. Slice lemon cross-wise and cucumbers into medium thick discs. Add lemon juice to a large pitcher, then add cooled simple syrup.
4. Stir well. Pour into glasses, adding a couple of lemon & cucumber slices. Garnish with a sprig of basil. Enjoy. (With or without a splash of vodka.)

...Read more

Sunday, July 4, 2010

Have You Tried Swiss Chard?


Note: I have been experiencing some problems with my email and my spam filter. I always read and respond to your emails so if you have sent me a note and I haven't responded, kindly send it again. Your comments and feedback are always appreciated. Thanks everyone for your support.

Last week, I added rainbow swiss chard to my growing container garden. It won't be ready for at least another 2 months, I think. So in the meantime, I will have to rely on Ontario farmers for my swiss chard fix.

I know that you've seen this beauty in the supermarket. It's one of those greens that sit by the cabbages, collards and kale aka the healthy and under appreciated vegetable aisle at the supermarket. You walk past it week after week without a second glance. But maybe this week it will be different?

Swiss chard is always a deep rich green leaf though its stem may come in an assortment of colours from creamy whites to golden saffron to ruby reds. The flavour is intensely earthy kind of like beet greens or spinach. It's fantastic alongside grilled meat. (I like it with hot Italian turkey sausage.)

When purchasing swiss chard choose a bunch that has ruffled leaves that holdes its shape and slender but firm stems.

Oh, and did I mention it's delicious? Next time, you're at the supermarket or at the farmer's market... check it out by trying this recipe from Marcus Sammuelson's cookbook, The Soul of A New Cuisine. (I am working my way through his cookbook, and it's superb!)

This recipe is a great way to acquaint yourself with this fine, invigorating vegetable.


Creamed Swiss Chard
Adapted from Soul of a New Cuisine by Marcus Sammuelson

2 tbsp vegetable oil
1 medium onion - roughly chopped
1 tbsp minced ginger
2 c shredded cabbage
1 pinch turmeric
1 c cream
1/2 c water
1 bunch swiss chard
1/2 c buttermilk
dusting of nutmeg
2 tsp salt (or to taste)

1. Heat oil in a large deep fry pan
2. Add onion & ginger until onion softens and ginger is fragrant
3. Add cabbage and turmeric. Stir and cook until cabbage softens.
4. Add cream and water and cook on medium heat for about ten minutes.
5. Meanwhile, trim and roughly chop swiss chard into bite sized pieces.
6. Toss swiss chard into pan and cook until chard is reduced. (Like spinach, it cooks down substantially)
7. Turn off heat and stir in buttermilk, dusting of nutmeg and salt. Adjust seasonings as required.
...Read more

Monday, June 28, 2010

Remain Calm & Have a Coconut Bar


Originally this week's post was going to be about turning on your oven in the summer. (ie. Who wants to do that?) But the day I made these gooey bars, Toronto experienced an "earthquake." It originated about a five hours drive from here so what we felt was less intense, but for those who never experienced one before, it sends you off kilter abit.

To comfort myself, I decided to calm my nerves by trying out a dessert I had on my "to do" list.

The inspiration for this recipe came from my Martha Stewart Cookie of the Day email. It was called Gooey Coconut Dream Bars. Wow. How can you resist that? It had me at gooey. I read the recipe and thought it was similar to alot of the bar cookie recipes I like. Pretty quick and easy. It's also a bit of a kitchen sink recipe. Have a small handful of dried cranberries? Throw them in. How about these nuts? Get them in, too!

It occurred to me that the cookie recipe turned out more squares than I wanted. Besides, I didn't have 2 cans of sugary, thick condensed milk, only the one. With some changes here and there, I present to you a bar that is reminiscent of some of my favourite desserts: butter tarts, caramel and macaroons.

Oh yes, all three flavours in one bite. Think creamy, chewy, sticky and certainly, gooey. You don't need an earthquake to make these bars, any old reason will do.

Coconut Bars

Crust:
1 c graham cracker crumbs
1/4c melted butter, unsalted
1/8 tsp salt

Filling:
1 c sweetened coconut flakes
1/2c semi-sweet chocolate chips
1/2c Thompson raisins
300ml sweetened condensed milk (1 can)

1. Preheat oven to 350 degrees. Prepare a 8 x 8 square pan by lining it with parchment paper. Leave at least a 2 inch overhang on two adjacent sides to ease of removal.
2. Mix crumbs, butter & salt together. Press evenly into the square pan, bringing at least 1/2" up the sides.
3. Bake for 12 minutes. Allow to cool slightly.
4. Meanwhile, mix together condensed milk, coconut shreds, raisins and chocolate chips.
5. Pour mixture into the prepared pan. Smooth out filling ensure that corners are filled.
6. Bake for 20-26 minutes. When the filling starts to caramelize and bubble along the edges, remove from oven. Cool.
7. With a sharp knife, cut squares. (Clean off the knife after each cut for a neat look.)

...Read more

Tuesday, June 22, 2010

Smoked Salmon With Fennel Salad


Some time during the month of June, I lost track of time. As I sat down to write this recipe, I had thought June had just begun but now it looks like we're on the last lap of the month. How did that happen? Well, at least, we finally have our weather. This morning, I went to look at my tomatoes & tomatillos and it's like they have grown overnight. Nice thick stems, beautiful verdant leaves and elegant little flower buds. (I especially love the smell spritzed into the air as I squeeze the suckers off my tomato plants. It is intoxicating like catnip for gardeners.) While the forecast for this summer is hot, I still cross my fingers for good weather and hopefully it will yield a bounty of highly rewarding, home-grown heirloom vegetables for summer eating.

Which brings me to this week's recipe... Outside of maybe barbeque, there is nothing that symbolizes summer eating more than a refreshing cool, crunchy salad. In our household, this week's salad is our current favourite. (Who can say no to smoked salmon?) It pairs feathery-thin fresh fennel with rich, smooth unctuous smoked salmon. It's a beautiful salad that can be piled high in a large bowl and gobbled up or it may be served elegantly on a long platter for dinner guests. Either way, it is delicious and does not require much effort.*

*Perhaps after you read this recipe, you will disagree, but I will disclose upfront that this recipe calls for shaved fennel. Therefore, it requires the use of some sort of kitchen gadget, I know. Although, shaving fennel may seem daunting and hardly worth it, believe me, it is worth it (and probably not as bad as you think once you get into it.) The papery slices of fennel stay crisp and crunchy but allows the vinaigrette to permeate creating a kind of "quick" pickle. It's an anise and citrus flavour explosion. Perfect for a hot day. Perfect paired with smoked salmon. Trust me. Worth the effort.


Shaved Fennel Salad With Smoked Salmon
Serves 4 as a starter (or 2 as a light lunch)

1/2 large fennel bulb (reserve some fennel fronds)
150 grams smoked salmon, sliced

1 tbsp grainy Dijon mustard
4 tbsp extra virgin olive oil
1 tbsp lemon juice
salt & pepper

1. In a large bowl, shave fennel into wispy thin slices. I use a benriner (or mandolin) but if you don't have one, slice fennel into thin pieces with a sharp knife.
2. On a large plate, lay out smoked salmon in a single layer.
3. In a medium sized jar, add Dijon, olive oil & lemon juice. Place lid on tightly and shake. Pour over fennel and toss. Add salt & pepper. Taste. Adjust seasonings as necessary then allow to fennel to marinate for at least ten minutes.
4. To serve, pile fennel high over smoked salmon. Sprinkle some of the reserved fennel fronds on top.

...Read more

Monday, June 7, 2010

Oh Happy Day!


I spent most of the weekend, in the backyard tending to my humble vegetable garden... finally. The heirloom tomatoes & tomatillos are now in and my peas, radishes, and beets now have their early leaves. Yes, I know it's already June and it is a little bit late, but I have a decent excuse. Our backyard renovations have just been completed. It was a total gut job. Unfortunately, it was not a renovation we had planned, but nevertheless had to be taken care of. In the end, we have a space at the back of our house we can claim as our home.

If that was not already enough to contribute to my joyful mood, my husband and I drove across the city to pick up this


It's an alpine strawberry. Perfect for container gardening and apparently superior in taste to the mass-cultivated sort. (I know it may be a little late - it's practically strawberry season around here. But I am an optimist.) While I love all my plants, my strawberry plant is my most precious. She is my pride and joy.

Oh happy day, indeed.

Onto this week's recipe...

For dinner this evening, my husband put steaks on the grill. I went into the fridge to rummage around for something else to go with dinner. Then an unusual guest made it to dinner last night. The previous day, I had summoned the courage to try Belgian Endive again after watching a review of a local restaurant on tv. I don't normally like bitter vegetables but, I thought I would give it a go.

Roasting vegetables seems to be such a natural way to eat them when it's warm out and the bbq is already on. The hot hot heat softens crisp vegetables, intensifies their inherent sweetness and exudes a wonderfully smokey aroma. There is nothing like the summer's bounty roasted on a hot barbie and why should endive be any different? The result is bittersweet, slightly crunchy and perfectly complemented for an unctuous bbq'd steak.


Grilled Belgian Endive


Serves 4

2 Belgian Endives
olive oil
salt & pepper

1. Heat BBQ on high heat (this can be prepared with a hot grill pan on a stove)
2. Clean & quarter Belgian Endives
3. Toss with olive oil & salt & pepper
4. Place on hot grill until grill marks appear & slightly caramelized. Flip and repeat on all three sides.
5. Serve immediately. ...Read more

Sunday, May 30, 2010

Warm Bok Choy & Mushroom Salad with Crispy Garlic

I'm back!

It was a splendid retreat to Barbados. The three of us splashed in the ocean, walked along the beach and filled our bellies with flying fish.


While on holiday, our hotel room had a small stack of high quality glossy magazines which really were adverts for duty free shopping, sport facilities (golf, polo!), and restaurants on the island. I never opened the duty free shopping or the sports magazine... There was only one magazine that was of particular interest to me. Not only did they have shiny photos of seared scallops, grilled tenderloin and glistening sashimi, they published feature menus from these establishments. I was obsessed with this little magazine. Night after night, I flipped through its pages dreaming of the culinary extravaganzas being prepared for the guests of this island.

This week's recipe was inspired by a menu item I found in the magazine.

It uses my favourite Asian green, Shanghai bok choy. It's very mild in flavour and holds shape fairly well. If you don't like bok choy or it's not available, you can also use other types of greens....baby spinach springs to my mind.

What I enjoy the most about this dish is the variety of textures... crunchy bok choy, meltingly tender mushrooms, crispy crunchy garlic bits.

This would be a wonderful accompaniment to grilled steak or seafood.


Warm Baby Bok Choy & Mushroom Salad With Crispy Garlic


2 garlic cloves roughly chopped
2 tbsp vegetable oil
1 lb baby Shanghai bok choy, washed & separated
1 lb assorted mushrooms (eg. oyster, shitake, etc.)
1 tsp mustard powder
1 tsp minced ginger
1 tsp low sodium soy sauce
1 tbsp oyster sauce

approximately 1 tsp lemon juice (about 1 wedge of a fresh lemon)
s&p to taste
sesame seeds

1. Heat a large frypan on high-medium, add 1 tbsp vegetable oil. Swirl around pan. When it shimmers, add garlic & turn down heat. Cook garlic until golden and caramel in colour. Do not allow it to burn. Set aside.
2. Roughly chop baby bok choy into bite-sized pieces.
3. Heat remaining vegetable oil on high heat. Add mushrooms, saute on medium heat until mushrooms lose their firmness. Add bok choy until wilted. Stir in mustard powder, ginger, soy sauce and oyster sauce. (Taking care not to leave the vegetables in the pan in too long.)
4. Add lemon juice. Taste, then adjust salt & pepper to your liking.
5. Return the crispy garlic to the dish. Add sesame seeds. Toss before serving warm.
...Read more
LinkWithin Related Stories Widget for Blogs