Welcome to My Kind of Food. Subscribe to my blog feed or sign up for email updates. (A confirmation email will be sent to your in-box prior to activation. )If you have any issues subscribing, please contact me at hungrygal@rogers.com

Monday, April 12, 2010

The Perfect Side: Roasted Cauliflower


Until several months ago, cauliflower was one of those vegetables that just was. I didn't love it but I didn't hate it either. It always seemed to make appearances at the snack table at some boring conference as part of the crudite platter. Meh. Although occasionally, it would make a delicious appearance in Aloo Gobi, an aromatic Indian dish of cauliflower and potato or simply steamed with a boatful of cheddary cheese sauce on the side. But outside of that limited repertoire, I wasn't really that friendly with the crucifer.

But then several months ago, I stumbled upon a Martha Stewart Food magazine recipe for roasted cauliflower. Finding this recipe was like a relevation. The skies opened and angels sang. Who would have thought to roast cauliflower? Brilliant.

I like roasting vegetables primarily because it is very easy to do and also it brings out flavours other cooking methods can't. In this case, roasting cauliflower results in a beautifully caramelized and sweet side dish. The inclusion of smoked paprika adds some depth to the crucifer's mild flavour.

The best part of this recipe is it takes no time to make it. Just need to break the cauliflower down into florets and it's good to go.

Additionally, I think this would make a superb cream of cauliflower soup. I will have to try it one day and post back if it works out...


Roasted Cauliflower
Adapted from Martha Stewart Food


1 head cauliflower
1 tbsp olive oil
smoked paprika
salt & pepper

1. Preheat oven to 400 degrees.
2. Meanwhile wash & dissemble cauliflower into florets.
3. Toss with olive oil. Season with salt & pepper & a pinch (say 1/4 tsp) of smoked paprika. Spread florets out onto two large baking sheets.
4. Roast in oven for at least 25 mins or until slightly bronzed and caramelized.
...Read more

Monday, March 29, 2010

Diggin' Through The Pantry


It was a daunting task... one I had been dreading for some time. But this weekend, I decided to fling the door open on my pantry to "re-discover" some of the treasures that lurked deep inside.

Among the unforgotten items, I found 3 bags of panko, 6 cans of tomato paste (um, have you seen the tv show, Hoarders?), 1/3 bag of split lentils, a jar of black rice, a package of falafel mix, and 1 carton of black strap molasses. Thankfully, none of my finds were in there too long, except for, maybe the molasses. But the lentils gave me an idea...

After spending time in Nepal eating nothing but lentil curry everyday at every meal, I lost my interest in the little legume. Now, I love them. In fact, I can't get enough of them. Especially as a part of a soup. With Spring upon us, I wasn't really in the mood for a heavy and hearty wintertime soup. I wanted a light lunch but, also something satisfying. One spoonful was all it took to make me smile. It's a kaleidoscope of bright colours with a very mild and fresh flavour. Just in time for Spring.

This week's recipe is very easy and fast to make. Lentils don't require pre-soaking so they cook rather quickly. But if you prefer, canned lentils substitute very nicely and speed up cooking time.

Just before serving, I add a healthy dollop of 2% yogurt and swirl it through the soup just before eating. It brightens up the soup, adding a tang & creaminess without the calories (if you aren't watching your weight, you could always use creme fraiche.)


Lentil Soup for Spring

1 finely chopped onion
1 tbsp olive oil
1 l low sodium vegetable broth (or chicken broth)
1 1/4c split lentils
1 large carrot roughly grated
salt & pepper

2% plain yogurt
approximately 1 tablespoon of herbs: eg. chives, dill, parsley

1. Lightly cook onion in a medium sized pot until onions are translucent. Add broth and turn up heat. Meanwhile, rinse lentils well. Add wash lentils and grated carrot to pot.
2. Simmer for at least 30 minutes. Check for seasoning and doneness.
3. Serve with a generous dollop of plain yogurt and a sprinkling of chopped fresh herbs.
...Read more

Monday, March 15, 2010

Drowned: Ice Cream Floats Italian-Style


There is a certain chain of coffee shops where people stand in long lines for a medium double-double. In this country, people are utterly devoted to this brand and you can practically find a location on every corner. While I understand the appeal, personally, I prefer a stronger brew.

Years ago, I bought myself a little espresso machine so I could get the good stuff at home. Oh, the joy it brought me! Lattes in the morning with the paper before work, and espressos in the evening after dinner. It was civilized. But over the years, our espresso machine gave way to our programmable coffee maker. It was a simple pleasure, to hear it buzz the beans in the morning and by the time we walked into the kitchen, coffee was brewing. It was nice but not the same.

We recently discovered some of the best coffee in Toronto but it didn't come from a coffee shop. Just a guy with a roaster (so his website says) who roasts some pretty delicious stuff. We bought 2 pounds of coffee: 1 pound of a fair trade espresso roast and another pound of a fair trade dark roast. Like children, we love both our coffee machines and we spoil them rotten!

Aside from drinking it, I made a simple but luxurious dessert with our espresso: Affogato. Literally, hot espresso poured over cold vanilla ice cream. Think of it as Italy's answer to the ice C\cream float.

Affogato means drowned in Italian. It's vanilla ice cream doused in a bath of hot, freshly brewed espresso. Pure heaven. (Even if you find espresso "too strong.") The creaminess of the vanilla ice cream tempers the assertiveness of espresso and the result is a rich, velvety, creamy and bold dessert. So simple, and so divine. The only challenge with this dessert is to try to savour it before all the ice cream melts away.

When you make such a simple dessert, splurge on good quality ice cream and espresso. If you don't have espresso, brew some good quality strong coffee.


Affogato
per person

Allow your guests to pour espresso on top of their desserts.

1 scoop vanilla ice cream
1 shot freshly brewed espresso (or strongly brewed coffee)

1. Scoop ice cream into dessert glass. Return the freezer while you make espresso.
2. Brew espresso.
3. Remove ice cream from the freezer and serve espresso alongside.
4. Pour espresso over ice cream and devour!

I have found the perfect proportion is one scoop of ice cream to 3/4 espresso shot.
...Read more

Tuesday, March 9, 2010

Duck, Duck, Goose...


One of my "to do"s this week was to cook that duck I received as a part of my Wholearth CSA (Community Sponsored Agriculture) "meat share."

Wholearth and other CSAs sell "shares" which entitle the buyer to an allotment of the farm's annual harvest. It is small-scale, community-oriented, local farming versus the ubiquitous agribusinesses which produce most of the fruits, vegetables, meat and dairy most of us consume. While I don't want to wade into food politics here, I would be remiss if I did not mention this as a hot button issue for many. My CSA experience has brought me closer to the food I eat. I have a greater awareness of where it comes from and the people who grow/raise it. Politics aside, I have noticed a discernable difference in the flavour of our meats - they tend to be absolutely tender and juicy. (My husband who is our family skeptic would even attest to this... :) )

Anyway, back to that duck in the freezer. We never grew up on duck at home. My dad does not like it and therefore, my mom never cooked it. But eating duck in a Chinese restaurant is certainly a spectacle to be experienced. Imagine a deeply lacquered bird presented to your table. A skilled server carefully lifting away the shatteringly crisp skin and cuts it into portions for the table, then he dissects the moist and flavourful meat into bite-sized pieces. However, making this dish (popularly known as Peking Duck) as Heston Blumenthal can attest to, is one cumbersome task. (Heston Blumenthal documented the arduous journey for the best Peking Duck in his television show, In Search of Perfection.)

I like duck but not enough to go through that hassle.

However, some research on the internet bolstered my confidence that duck could be prepared easily and quite deliciously. As easy as roast chicken. With my new found knowledge in hand, I set out to make a darn good roasted duck.

We ate this gorgeous beast in a cheater's version of Peking duck. I removed the meat from the carcass and served it with traditional accompaniments: Hoisin dipping sauce (recipe below) and lots of fresh, juicy cucumber. We skipped out on the pancakes (too tired to make and too lazy to buy) and green onions. Perhaps next time...

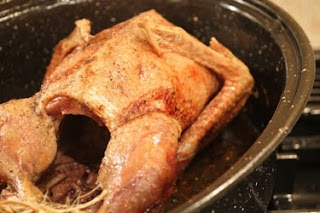
This recipe produces a duck that is moist, richly flavourful but not greasy. We gobbled up the skin like children eating candy and the rest of the duck disappeared shortly thereafter. We saved the bones for stock and some of the fat for frying eggs for breakfast the next day. (In addition, I have used duck fat to roast potatoes and they are marvelous.)

Roasted Duck with Hoisin Dipping Sauce


3-4 lb duck
1 tbsp minced ginger
salt & pepper

1. Preheat oven to 375 degrees. Wash duck thorough and pat dry.
2. Sprinkle salt & pepper over duck's skin and inside the cavity.
3. Rub ginger inside the cavity. Truss duck and place in large roasting pan.
4. Roast duck for at least two hours. Basting occasionally.
5. Turn oven temperature to 350 degrees and continue to roast for another 30 minutes.
6. The duck is ready when the skin is browned and crisp and the legs appear very loose. (Legs should come off very easily by the time you serve.)
7. Allow duck to cool for at least 15 minutes (or cool enough to handle)

At this point, you can serve the duck by cutting it into quarters and serving or pull off the bones and serve with this silky Hoisin dipping sauce and lots of cucumber spears.

Hoisin Dipping Sauce
2 tbsp Hoisin
1 tbsp lemon juice
zest from 1 lemon
1 pinch of chili flakes
1 tsp honey

1. Mix together and serve with roasted duck. (Also is great as a marinade for chicken or fish.)

...Read more

Monday, February 22, 2010

Oh Canada!


If you've been living on a desert island, you may not be aware that the Winter Olympics are currently taking place in beautiful Vancouver, British Columbia. It's somewhat of a big deal here in Canada and admittedly, I do beam with pride when I see those gorgeous aerial shots of Vancouver and surrounds. It's a beautiful part of our country and I am glad that the rest of the world now knows about this magical and beautiful place.

Not only is Vancouver known for its spectacular natural beauty, it is also a mecca for cuisine. Some of Canada's best known restaurants and chefs are found in this city and food trends that eventually find themselves in Toronto often have their roots in Vancouver. With its close proximity to the sea, it is no wonder that Vancouver also boasts some of the best sushi outside of Japan. And if you are in search of seriously fresh fish and that connection to the people who "catch" your food, drive out to Richmond, a suburb of Vancouver, to meet the fishing boats and inspect that morning's catch. You probably couldn't find fresher fish.

For this week's post, I thought I might do something Canadian inspired to celebrate the Olympics. While there isn't really a Canadian cuisine in the same way there is distinct French, Japanese or Italian food, I think the consensus is that Canadian cuisine is probably characterized by the use of our local produce and local flavours.

I came up with a dish that reflects the foods of this vast nation. From the West, there is nothing more reflective of BC than salmon, from the Prairies, I chose lentils (Did you know that Canada is the world's largest exporter of lentils?), and from the East, glorious maple syrup from Quebec.

The salmon is prepared very simply - it is pan seared until the skin crisps up and finished with a glaze of maple syrup from Oka, Quebec. Then it is laid a top of bed of lovely brown lentils. (For this dish, I prefer French lentils (when I can find them) as they keep their shape and don't shed their skins when cooked. Unfortunately, for this post, I could not find them and have substituted brown lentils. The texture is slightly different but still delicious nevertheless.)


Grilled Salmon with Warm Lentil Salad

1 lb Pacific center-cut salmon - cut into four portions (or if you are looking for larger portions, I would say 1/2lb per person)
1 c brown lentils (or Du Puy aka French lentils, if available)

1 lemon - zest & juice
1 1/2 tbsp capers
1 tsp sugar
2 tbsp light olive oil
1 tbsp vegetable oil
optional: maple syrup for finishing

1. Cook lentils according to package instructions. Do not overcook.
2. Meanwhile, roughly chop capers. Add to a large bowl along with lemon zest, juice, sugar & olive oil. Once lentils are cooked drain them well and add them to vinaigrette. Gently toss.
3. Heat 1 tbsp of vegetable oil in a large pan on high heat. Turn down to medium-high and cook salmon skin side down until the skin is nicely browned and crisp. Carefully turn fish over and cook on the opposite side. Cook until medium - approximately 10 minutes.
4. Serve salmon immediately on a bed of warm lentils.

*If there is leftover lentil salad, it is delicious on its own with some crumbled goat cheese on top.

Go Canada Go!
...Read more

Monday, February 15, 2010

A Light Lunch

It's been three months since I had my baby. He's healthy, beautiful and wonderfully cheery.


And while it took nine months to put on the weight during my pregnancy, I am quite eager to get to my pre-pregnancy shape.

It's time to take action.

But I love to eat and this is a food blog... so let's not go crazy here.

Maybe we should have lunch first....

Normally, I make a mini version of these crab cakes as an hor d'oeuvre for parties. And gosh, they are delicious. These are so simple to make, perfectly paired with a light salad for lunch.

I use lump crab meat as I love biting into the little nuggets of crab delicately held together by a savoury, moist filling brightened with a hint of citrus and dill.


Crab Cakes
(makes approximately 4 crab cakes)

1/4 lb crab meat, well drained (lump crab if you have it)
1 tsp finely minced dill
1 tsp finely minced parsley
1/2 tsp celery salt
pinch of smoked paprika (or regular paprika)
pinch of freshly ground pepper
1/2 c panko crumbs
1 egg lightly beaten
1 tsp lemon juice
(* 1 tsp Old Bay Seasoning - I normally add Old Bay to my crab cakes but it isn't available everywhere. If you have it, I'd reduce the celery salt to 1/4 tsp but add a pinch of salt to the mixture.)

1/2 c panko crumbs in a separate shallow bowl

1 tbsp butter

1. Gently fold dill, parsley, celery salt, paprika, pepper, panko crumbs, egg and lemon juice into drained crab. Don't overmix and try to keep crab in chunks.
2. Divide the mixture into quarters and gently shape into patties.
3. Gently coat crab cakes in panko bread crumbs. Set aside on a plate. Repeat. Cover crab cakes with cling wrap and refrigerate for 30 minutes.
4. Melt butter over medium heat in a large fry pan until butter is foamy.
5. Gently fry crab cakes until golden brown and toasty. (Flip crab cakes over only once.)
6. Serve immediately with a side salad.
...Read more
LinkWithin Related Stories Widget for Blogs